
Thrift Flip: DIY Terracotta Decorated Vases
Coming to you this week with a DIY I almost gave up on. What I love most about this DIY is that it proves projects aren't always linear; they can have many iterations along the way and sometimes you just have to go with the flow as you exeperiment with new mediums. My original plan involved spray paintingall the vases white again and try using paint. And while I was at Bunnings choosing paint samples, this project took a sudden turn when I was introduced to Megatreat Liquid Terracotta paint. Yes, you read that correctly - liquid terracotta paint. I promptly went home, painted them again and also created a DIY within a DIY by gluing a basket on the top of one of the vases, and here we are. I absolutely love this upcycle and I hope you do too! Read on to find out how you can make your own DIY Terracotta Decorated Vases.
DIY Terracotta Decorated Vases
As you may have seen on Instagram, I started working on some DIY Checker Vases but I wasn't loving the process (it was taking ages). I was also using POSCA pens and wasn't loving the colours that were available at Officeworks. I wanted to see if I could paint the vases instead, so I set about starting all over again. I spray painted the vases white (again) and set about going to Bunnings (my second home) to find a few sample paint pots in greens and pinks (as you can tell by my website I love those two colours). Interestingly I was drawn to the more earthy terracotta tones. I must have been staring at the colours available for ages because a team member from Bunnings came up to see if he could help me. When I explained my conundrum and what my plans were with the vases, he immediately asked me to follow him over to the next aisle where he pulled a tub of paint off the shelf and officially introduced me to Megatreat Liquid Terracotta paint. I was like, "ummm, hell yes."
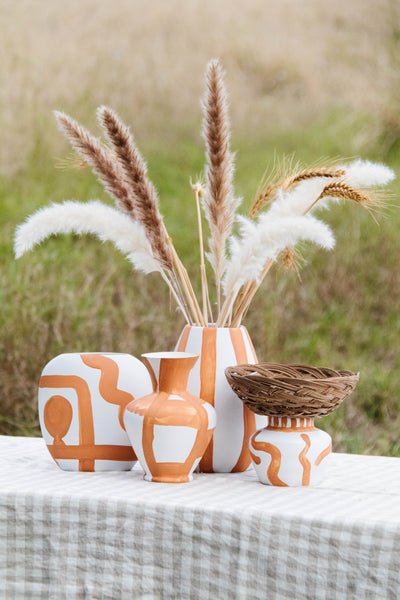
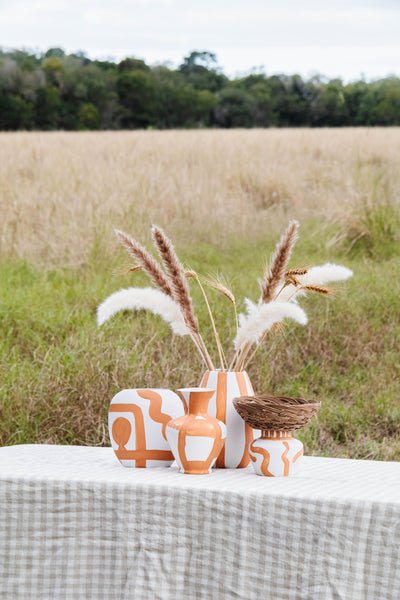
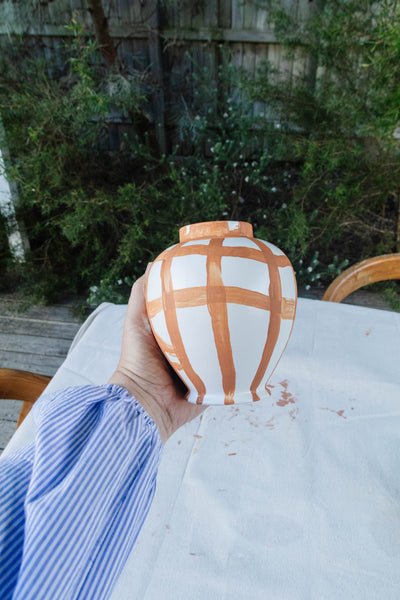
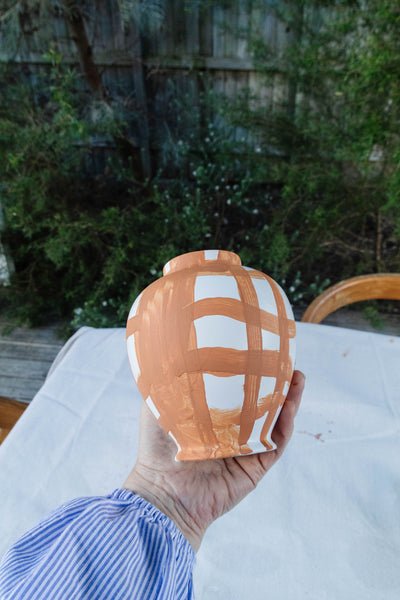
I can't believe I never knew this product existed (it also comes in a Liquid Sandstone as well)! This liquid terracotta paint is exactly that, it's a natural clay coating used to paint almost everything (well, most building surfaces) including planter boxes, retaining walls, courtyard walls, floors and lots more. He opened the tub and showed me the texture with his fingertips to show that it literally is a liquid form of clay but also paint. It's water based, anti-fungal, non toxic and can be used inside and outdoors. Incredible! I bought some fine paint brushes and went home to experiment. The paint is actually quite thin and really different than normal paints, so my first vase was an absolute fail. I quickly came to learn that painting a checker pattern on these vases was not going to work. So instead of worrying about how it would look, I just painted each vase in patterns that were fun and felt natural to me. At first I thought they looked like Dusty had painted them (you know those vibes) but realised when they dried, how beautiful they actually looked! Although when I painted the circle on one vase, the paint dripped down so I had to kind of cover that up, but that's the DIY life!
What I love most about this project is that you you only need a few materials to make it happen AND you can make the design your own. You can paint stripes, waves, dots, wiggles, circles, scallops - anything! You can also use any paint you like, and can go large or small with the vases. I also glued a little basket I picked up at my local tip shop this week for $3!

Materials
Secondhand vases
Clean cloth
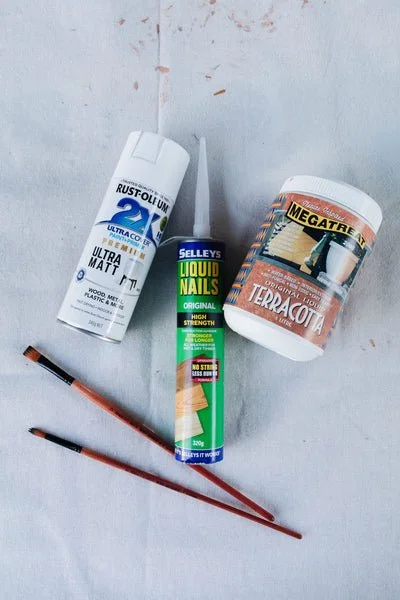
White spray paint
Megatreat Liquid Terracotta from Bunnings
Renoir Craft Round and Flat Paintbrushes from Bunnings
Selley's Liquid Nails
Small basket
How To
Watch these little videos to see how these vases came together.
Wipe the vases clean with a dry and/or damp cloth.
Spray paint each vase and set aside to dry. Repeat.
Using a paintbrush, decorate each vase as you like using the Megatreat Liquid Terracotta. Set aside to dry; it dries fast which is great! If you like, paint two coats for a thicker terracotta look.
You can also glue a small basket onto the top of a vase too!
And that's it!


And here's the proof that not every DIY project works seamlessly! They can have many iterations along the way and sometimes you just have to go with the flow as you experiment with new ideas and mediums. I am definitely not destined to be a painter of vessels and I had to get used to using the thin liquid terracotta paint, but regardless I am so happy I persisted. I still want to create a checker DIY and I've got an idea brewing, so stay tuned!
A little note from me…
Thank you so much for taking the time to read through this tutorial. I hope you enjoyed it and feel inspired to make your own! You can also stay in touch with me by following along on Instagram and Pinterest, or sending me an email at jaharn@smorkitchen.com. Happy cooking, happy making!
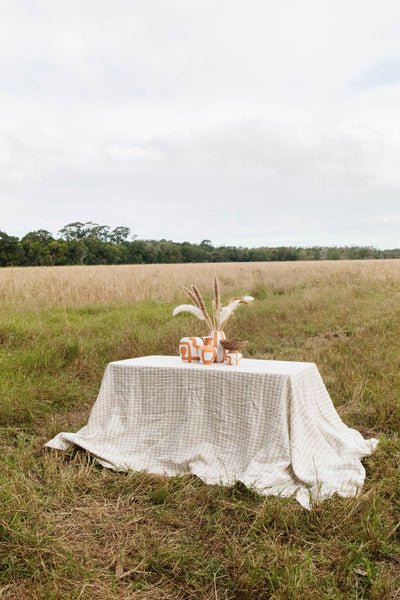
And for those wanting to know, the table cloth featured in these images is from I Love Linen, and it's absolutely gorgeous!


